
How-to: Mapviewer Integration with OBIEE 11g
I’ve seen quite a few articles on OTN and Google which outline how to configure Mapviewer for your 11g solution. The problem is that many of these articles are:
1) overly complex
2) out of date
With the release of OBIEE 11.1.1.6, mapviewer comes pre-configured with weblogic and the only installation steps required are:
- installation of navteq mapdata to your oracle database
- establish a column based relationship between the map and a subject area
You do not have to modify any weblogic XML files, install any mapviewer jar files, or do any configuration within weblogic. Below is a step by step guide on how to configure and use mapviewer on your 11.1.1.6.x box:
Step 1: Download the mapviewer ‘mvdemo’ data into your Oracle database
Oracle provides pre-configured maps, coordinates, and navteq data that use can use in your reports. You need to download the MVDemo Sample Data Set .
Step 2: Create the mvdemo schema in your Oracle database
We’re going to import the navteq map data into an mvdemo schema in step 3. Let’s go ahead and create the mvdemo schema by typing the following command into your SQLPlus prompt:
grant connect, resource, create view to mvdemo identified by mvdemo
Note that you will need the appropriate privileges to create this account. If denied, try logging in as sysdba by typing the following command into sqplus:
CONNECT / AS sysdba
Step 3: Import navteq data dump to your Oracle database
Unzip the MV Demo Sample Data Set you just downloaded, and note the location of the ‘mvdemp.dmp’ file. This is the file we will import to the database.
Step 3.1)
Find the imp utility on your machine. It is usually located in your $ORACLE_HOME\product\11.x.x\dbhome_1\BIN folder
Step 3.2) Navigate to that folder via command line and run the following command:
imp mvdemo/mvdemo@ORCL file=mvdemo.dmp full=y ignore=y
where ORCL is your database SID
and file=mvdemo.dmp is the path (including mvdemo.dmp) to the dump file
You should get the following result:
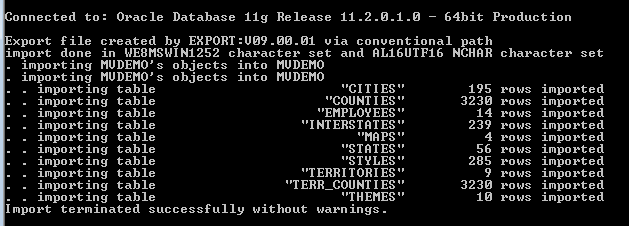
Step 4) Import the map meta data
The Map Viewer Sample Data Set comes with city, county, state, highway, and other geographical map based data that you can impose onto the map. We’re going to import this data set by running the following command in sqlplus:
:
@mvdemo.sql
Note that you must include the path of the mvdemo.sql file e.g. @C:\folder\folder1\mvdemo\mvdemo.sql
Configuring mapViewerConfig.xml Configuration File
1) Access the MapViewer by going to the following URL:
http://machine.domain:9704/mapviewer
2) Click on the Admin link.
3) Log in to MapViewer using the same administrative user that you use to log in to the WebLogic console and FMW EM console.
4) Click on Configuration. That will open the mapViewerConfig.xml configuration file.
5) Make the following changes:
a) Under <security_config> tag set the following values:
<disable_direct_info_request> true </disable_direct_info_request>
<disable_info_request> true </disable_info_request>
<disable_csf>true</disable_csf>
<enforce_security_role> true </enforce_security_role>
b) Under <security_config> tag set the machine name (replace machine.domain by the proper host name where the MapViewer instance is running. The screen shot also shows machine.domain but you should enter the correct server name):
<proxy_enabled_hosts>
http://machine.domain:9704/mapviewer,http://machine.domain:9704/
</proxy_enabled_hosts>

6) DO NOT click on “Save and Restart” button. That will make the Weblogic console, FMW EM console and Analytics inaccessible and you will need to restart the whole instance.
DO NOT click on “Save” button, yet. We still have to make more changes to the MapViewerConfig.xml file.
Creating the MapViewer Data Source
1) Scroll all the way down in the MapViewerConfig.xml file. You should a sample Data Source (commented out) that:
<map_data_source name=”mvdemo”
jdbc_host=”db1.my_corp.com”
jdbc_sid=”orcl”
jdbc_port=”1521″
jdbc_user=”scott”
jdbc_password=”!tiger”
jdbc_mode=”thin”
number_of_mappers=”3″
allow_jdbc_theme_based_foi=”false”
/>
Use this sample Data Source to create your own Data Source to the database where the spatial data and MapViewer metadata resides. Copy and paste the tag just below the existing one. Make sure that you are not copying the opening comment tag <!– and closing comment tag –>
It should look similar to this (change machine.domain by the proper host name. Also change, Oracle SID, database port but the proper values):
<map_data_source name=”mvdemo”
jdbc_host=”machine.domain”
jdbc_sid=”obiee11g”
jdbc_port=”1521″
jdbc_user=”mvdemo”
jdbc_password=”!mvdemo”
jdbc_mode=”thin”
number_of_mappers=”3″
allow_jdbc_theme_based_foi=”false”
/>
Please, note the exclamation mark (!) preceding the password. That tells MapViewer that the password should be encrypted next time the MapViewer instance is restarted:

6) DO NOT click on “Save and Restart” button. That will make the Weblogic console, FMW EM console and Analytics inaccessible and you will need to restart the whole instance. Click on “Save” button instead.
Restarting BI Managed Server and BI Components
In order for these changes to take effect please do the following:
Stop:
a) BI Components either using FMW EM Console or opmnctl utility.
b) The BI Managed Server using the WebLogic console.
Start:
a) The BI Managed Server using the WebLogic console.
b) BI Components either using FMW EM Console or opmnctl utility.
Please check the following note if you need assistance starting and stopping a BI instance:
1240964.1 How To Start / Stop An OBIEE 11g (11.1.1.x) Unix / Linux Environment Via Command-line
Verifying the MapViewer Connection
1) Access the MapViewer by going to the following URL:
http://machine.domain:9704/mapviewer
2) Click on the Admin link
3) Log in to MapViewer using the same administrative user that you use to log in to the WebLogic console and FMW EM console.
4) Click on Data Sources. You should see the Data Source that you just created. The blank space that you see in the screen shot between the @ symbol and the obiee11g instance name, should have the machine.domain in your configuration if the changes were successfully committed.

Part 2b
In your work directory, open a Sqlplus session and connect as the SYSTEM
user. Create a user for the World Sample data (if you have not previously
done so):
C:\world_sample> sqlplus SYSTEM/password_for_system
Iinstalling the World Sample data
A. Create A tablespace called USERS if it is no there already:
B. Create the world_sample user:
CREATE USER world_sample
IDENTIFIED BY world_sample
DEFAULT TABLESPACE USERS
TEMPORARY TABLESPACE temp
QUOTA UNLIMITED ON USERS;
GRANT CONNECT, RESOURCE, CREATE TABLE, DBA TO world_sample;
3. This step loads the World Sample data into the specified user, and creates
the metadata required to view the sample data as a Map in MapViewer.
This step assumes that you are already connected as the user created in
the steps above and that you are in your work directory.
To begin, run the load_sample_data.sql script in your Sqlplus
session. Exit the Sqlplus session after the script has successfully
concluded:
impdp world_sample/world_sample directory=world_dumpfile_dir file=world_sample.dmp log=world_sample.log full=y
connect world_sample/&world_sample_password
INSERT INTO user_sdo_maps SELECT * FROM sdo_maps;
INSERT INTO user_sdo_themes SELECT * FROM sdo_themes;
INSERT INTO user_sdo_styles SELECT * FROM sdo_styles;
INSERT INTO user_sdo_cached_maps SELECT * FROM sdo_cached_maps;
COMMIT;
Importing the MapViewer Metadata into OBIEE
1) Log in to Analytics by going to the following URL:
Administration -> Map Data Management -> Manage Map Data -> Layers tab -> click on Import Layers button -> select your Data Source under “Look in” -> from the list of Themes select:
THEME_DEMO_STATES
THEME_DEMO_STATES_LINE
Then click OK.

2) Click on THEME_DEMO_STATES Layer -> click on Edit Layers button -> click on the plus sign (Add New BI Key) -> select “A – Sample Sales” subject area -> expand “Customers” dimension on the left pane -> Cust Regions -> double click on C54 State Code to select it -> click OK.
Click on Sample Data link to verify that the data in OBIEE table (2 letter state code) matches the data on the Oracle Database where the spatial data is (2 letter state code: STATE_ABRV column). Click OK.

3) Click on Background Maps tab -> click on Import Background Maps -> select your Data Source under “Look in” -> from the list of Tile Layers select :
DEMO_MAP

4) Click OK. Click on Edit Background Maps button -> if you want to change the zoom levels at which OBIEE data will be shown do so by clicking on the Zoom levels. Otherwise, click OK. Click OK.

Creating an Analysis in OBIEE with a Map View
1) Create an Analysis: go to New -> Analysis -> select “A – Sample Sales” subject area. Select the following columns:
a) Expand Customers dimension -> Cust Regions -> C54 State Code
b) Expand Based Facts -> select Revenue and Billed Quantity
c) Expand Time dimension -> select T05 Per Name Year
2) Create 2 filters:
a) Year filter: select 2008, 2009 and 2010.
b) C54 State Code filter: select a handful of states.
3) Click on Results tab to show the Data View.
4) Go to New View -> Map. The map should be shown.

No Comments